Showing posts with label how to. Show all posts

Tuesday, February 04, 2014

Smartphone Photo Edits & 2:365


I just love taking photos on my iphone, it's so much easier to quickly whip out of my bag or pocket than my DSLR is.  I also love how quick it is to edit your photos with some easy apps, they can really make a difference and help the image look more like what you're actually seeing with the naked eye.

I'm working on a little how-to guide for editing smartphone photos, is there anything you'd like me to add?


Today was Day 2 of my 365 daily creativity challenge.  There were lots of birds around me today including a gorgeous heron that visited my backyard which lead me to the word "Free".  The stunning bird in this photo was made by the terribly talented Sam from Jetta's Nest.

I'll be putting updates of this challenge on the blog every now and then, but aim to upload it daily to instagram.

Monday, November 05, 2012

Me, the Page 84 Girl - the blog post also known as Tips for Taking Photos for Online Sales

It's quite strange opening the Sunday paper and finding yourself gracing one of its pages, but  that's just what happened yesterday.


Now you'd think I would have tidied up more on the day the photographer came into my studio...


The article was about a talk I give from time to time about taking photos for online sales for BrisStyle's "I heart Craft sessions".  I used to be a professional photographer, back in the darkroom days, but there are many simple set ups and basic tips that can really make a big difference and let your images make a huge impact.

Think about when you go shopping in a bricks and mortar store.  You often pick up a piece that you're interested in, you can feel its weight and texture, instantly know its size, can see it from all different angles... online shoppers still want that experience and your photographs can help give it to them.  Years ago when I began selling online I remember hearing the advice "Photograph as if there is no written description (and write as if there is no photograph)".  High quality photographs also give your store a professional edge and help with online marketing through Etsy treasuries, blogs and sites like Pinterest.

These simple things can really improve your imagery;

Write with Light
The word "photography" comes from a couple of Ancient Greek words that mean "to write" and "light".  With this in mind it's easy to understand why the light on your subject should be your first concern.
  • Where possible, use soft, natural light.  Don't use the flash on top of your camera (unless you know what you're doing with it) or go into direct sunlight in the middle of the day, this will create harsh shadows and be unflattering.
Retro Black Cat Hairclips

  • In Queensland we're lucky enough to get lots of lovely light all year round.  I photograph next to a large window and use a white piece of cardboard to reflect light back into the other side.

  • If your light source isn't very bright, use a tripod to steady your camera and avoid blurry photos.

Learn About Aperture
The camera's aperture controls how much light enters your lens at one time and as a result, affects how much of your subject will be in focus at the same time (this is called the "depth of field").  The easiest way to remember which way to go is that the smaller the number (f stop), the smaller the amount of your photograph will be in focus.  A small area in focus can really help to separate your item from the background, but a large area can help if your active toddler is modelling your carefully made children's clothes.

There are some great pictorial examples online to help you understand the aperture's affect; here, here, here and here are some places to start.

If not feeling comfortable with going on a full manual setting on your camera, most digital cameras have an "Aperture Priority" setting that will allow you to control your aperture and then will adjust your shutter speed to ensure that you have correct exposure.

Choosing Your Camera
The great thing about today's technology is that you can get amazing digital cameras for quite reasonable prices.  When choosing your camera, pick one that you're going to feel comfortable using.  There's no use buying an expensive DSLR if it's going to sit on the shelf because you don't know what to do with it.  If you make small items like jewellery put your main investment into a good macro lens, even some small point-and-shoot cameras have great macro lenses.  If you ask at any decent camera store, they should be able to point you in the right direction.  Etsy have written some good advice when it comes to choosing a camera.

Composition
  • It's usually best not to place your item smack, bang in the centre of your photo, but rather off-centre them a bit with the Rule of Thirds in mind.  It makes for a much more interesting photo.
  • If your subject is directional, have it moving into the frame and not out.
Chevron Necklace by Modrn

  • Think about different angles that you can photograph from to make the photo more interesting.  When photographing children's items for example, it's great to get down low to give a feel of how they'd see it.
Vintage Mattel Blocks by Flume Street


Model it for me Baby!
Photographing your gorgeous creation on a model can not only really help a buyer understand it's size, but also allows you to create a feel for your brand.

Gold Zing Headband by JanineBasil


Backgrounds, Props and Staging
Your backgrounds and props is another chance to tell a story about what you make and to communicate your brand.
  • Keep your background simple.  Don't let it distract from what you're actually trying to sell.
  • In most cases, try to avoid horizon lines.  
  • A little bit of subtle texture can go a long way, but you don't want it to be a "muddy" looking one or one that creates too many shadows (your eyes will be drawn to those shadows instead).
  • Make sure that any props you use add to the story of your piece.
Cosy vintage Caravan and Combi Convo by Sconnie and Jam

  • A hand or a mannequin can be a simple prop.
  • Props can help to communicate how your creation can be used as well as give an indication of size.
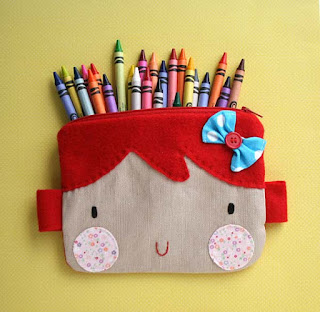
Red hair sweet face zipper pouch by sweetdolls

  • If you have nice packaging, it's good to include that in one of your photos as well.
Teapot Brooch

Editing Your Images
I recommend to always edit your photos before you upload them to an online store or site.

The most important things to do are; 
  • Crop and resize (but when resizing, keep a copy of the original larger file first!  You never know when your favourite magazine is going to call and ask to feature your creation).
  • Check your exposure and contrast.  You want your whites white, your blacks black and a nice range in between.
  • Correct any colour casts.   The cause of these includes indoor lighting (fluorescent lights have a green tinge, incandescent bulbs an orange colour etc).
There are other many different photo editing programs out there.  
  • I think PicMonkey is a great site (and the "Weight loss" tool is lots of fun!)
  • This post has a good list of other options, both downloadable and online.


A Few More Things to Think About...
  • Be consistent with your images - remember they are all communicating your brand.
  • Think about how a store thumbnail is going to look once the photo has been cropped to the site's format.  Etsy now allows you to adjust this when listing an item.
  • Use all the images that the site allows (Etsy allows five).  A teaser image (often a close up) can work well as the first image and you can show your product from different angles as well as illustrating your packaging.
  • Look at sites such as Etsy, Flickr and Pinterest for inspiration (but inspiration only).  Look at what images you like and think about why they work.
  • Save yourself some time by photographing in batches.  This will also help with the consistency of your images.
  • And lastly, do what your time and lifestyle allows.  I don't practice all that I preach due to the time constraints that a busy wholesale business plus a very active three year old put on me.  Even if you put a few of these tips in place, you should be well on your way.
Do you have any tips you'd like to share, or ones that you've found particularly useful?  Or feel free to pop some links to your online images in the comments, I'd love to hear from you.

Sunday, April 15, 2012

How to Make Japanese "Kanzashi" Style Flower Brooches


I fell in love with these gorgeous little fabric flowers, "Tsumami Kanzashi", when I was living in Japan.  Traditionally, they are delicate little pieces made from a fine silk crepe and formed together to create the amazing Geisha hairpieces.  Not being an elegant geisha myself, I've made these brooches bigger and bolder and with antique kimono silks as a nod to their heritage.

They are quite simple to make and after you've done a few you could find yourself quite addicted...

What you'll need;
  • A small piece of fabric, about 5 x 25cm is a good place to start.  It's good to use a fabric with a bit of substance to it, but not too thick.  I used interfaced kimono silks but a starched cotton also works really well.
  • Hand sewing needle, thread, scissors.
  • Five pegs (just from the washing line)
  • Bead and bead caps (optional)
  • Small piece of felt
  • Craft glue
  • Brooch back

Got your bits and bobs?  Let's get started shall we?

1.  Take the piece of fabric and cut it so that you have five squares the same size.  About 5cm is a good place to start.  Your final flower will be about the same size as one of those squares.

2.  Take one of your squares and fold it in half to create a triangle with the right side facing out.  Give the fold a bit of a finger press.  Fold that in half again, so that the triangle is half the size.  At one corner, the fabric will have two loose points.


3.  Take one of these points and fold it backwards so that you keep the raw edges together.


4.  Take the other loose corner and fold it back on the other side so that it looks like the picture below.  You've folded your first petal.  Put a peg on it to hold it in place.


5.  Repeat this until you have five petals.

6.  At the corner where you have the three points meet, very carefully trim a couple of millimetres.  This is going to be the centre of your flower and the trimming helps them sit a little neater.

7.  Take one petal and stay stitch in close to the corner.  A little thread sitting on the raw edge will also help keep everything together. 


8.  Making sure that it is facing the same way up, thread the next petal onto the cotton and stay stitch the second petal.  You won't be stitching the petals together just yet, but it's a bit like stringing beads onto a line.

9.  Continue until you have all five petals on the thread.  Line them up.


10.  From the line, take the outside edges of the first and last petal and hold them together.  Flip the flower over so that your raw edges are facing upwards.  This is where you want all your stitches to go.


11.  Stay stitch the two together very close to their corners.


12.  Then again about 2/3 of the way up.  You could do neat little stitches all of the way, but as this will be covered by felt later, I don't bother.


13. Then, with your first and last petals joined, grab the next two folds - what will be outer folds of the first and second.  Scroll down to a couple of photos down and you should get what I mean.

14.  Stay stitch in the centre again, and then 2/3 of the way up.  Don't worry that the stitching may be a little messy at this stage, it will be covered up later.


15.  Continue until all five petals are joined.  In the photo below you can get an idea of what the stitching will look like.


16.  This is my favourite bit... flip the flower over.  At this stage the petals will all be a bit pointy.  Take a finger or thumb and push the petal into a rounded shape.  It will take a little fiddling and squishing until the fabric wants to sit the way you want it to.  I go around the flower a few times pushing and squishing.


17.  You should now have a lovely little Japanese plum flower.


18.  Bead the centre of the flower how you wish.  I like to put a bead cap or two in and then a bead that will highlight one of the colours in the flower.


19.  Flip the beaded flower over and put some craft glue on the raw edges.  Adhere it to some felt.  Once the glue has dried, stitch the edge of the flower onto the felt to reinforce it.  Trim the felt.


20.  Finally, sew a brooch back on and it's ready to wear with pride.


Before you know it you'll be looking around at little bits of fabric you have around the place and your garden will begin to grow.

Pin It

Sunday, September 26, 2010

Taking Photos for Etsy - Useful Links

Yesterday I had a great time running a session for some of the BrisStyle members on taking and editing photos for Etsy.  It's funny though, I felt like I needed to start with a disclaimer - I did my photography degree pre-digital days and product photography was not one of my best subjects.  

While I don't think I came up with anything that isn't already out there in the internet world, I hope that putting lots of information together at one time might have helped.


Along the way of putting the session together I came across some very useful links on Etsy on the subject that I thought I'd share;


Photographing 2D artwork.  Some really simple ideas for people that sell prints of their work.  During the session I also got talking about photographing fabric.  A seller who I think does an excellent job of giving life to this flat medium is Karaku


Brightening your photos using Picnik.  Personally, I'm a photoshop gal, but for this session I realised that the software is quite an investment and not really worth it for those who want to use a few simple photo editing functions.  I had a play with Picnik and was really impressed by how simple it is to use and how effective it is.


A basic how-to video on Photoshop.  This video (from youtube) is a 50 minute investment but from the parts I've watched, it seems to do a good job of covering the basics.


Photo tips including lighting.  In this tutorial she also talks about knowing your camera, colour and reflection and translucence.


Taking (and editing for) sharp photos.  This lesson goes over a number of things that will affect how crisp your resulting image will be.


Styling your photos and including props.  Photo styling is really not my forte' (hence why I didn't do so well in my product photography classes) so I found this article really quite interesting.  It goes into the thought behind what props help create the story of your product.  Make sure to scroll down to see some of the example images at the end, I just love the choker in the frame image.


Before and After photos.  Oh how I love a makeover.  I have (not so secret anymore) secret addiction to before and after shows.  Looking at the examples in this article does make you think about what it is about your own images that you could change.  In a similar vein is the Etsy Shop Makeovers group on Flickr which I believe that anyone can join.


Photographing for Etsy - a video by Etsy.  This is both a fun and interesting video to watch and shows some examples from a few different Etsy shops.  One thing from this that I found really interesting was what they said about having a person model clothing as opposed to it being on a mannequin - that items that were modelled sold so much more quickly than those not.  This statement was backed up by a few people in yesterday's session as well.


Photographing Jewellery.  A good little tutorial focused on the specific challenges of photographing jewellery.  I really like how some of the examples they have used in this also show the additional four shots used for the listing, it's good to see how the different angles work together.  There is also a link in here for making your own light box.


Collaborating with Photographers. This one is a little different - focussed on clothing designers who don't feel like the photos they take themselves gives justice to their work.  It looks at collaborating with photographers as well as an interesting take on getting your pieces on musicians and celebrities. 

Sunday, March 16, 2008

This is... my creation!

.... and I'm so excited!


This post could also be called "This is... what I've been doing instead of all the other stuff I should be doing considering I fly out for my holidays in a couple of days"... but we won't worry about that will we? Thanks to Betty the Geek for this week's theme.

This was my second attempt using the silver clay. You can see my first attempt here. While I'm a complete beginner, I still thought you might be interested in how it all works and the mistakes I made along the way.


I found myself moving to different areas of the apartment for different stages. So this really was workspace number one.
What I have here is a packet of PMC3 and the PMC3 syringe. I've covered my cutting board in baking paper so that the clay doesn't stick. Under the baking paper is a mark out of the pieces I want to make and their sizes. On top of the baking paper, on either side of that markup is a few pieces of cardboard stacked to equal the height of what I want the clay pieces to be. In one bowl is water, the other olive oil. The olive oil is good to stop the clay from sticking to your hands and utensils. There's a straw to help shape the bead at the top and a film container to collect dry bits of clay. I put some of those bits into the lid with a bit of water and use a paintbrush to create slip, to help join pieces together. I have a dry and a wet hand towel. There's also a rolling pin, some kitchen towel and a knife.

The clay comes out like plasticine. It's really easy to use. I rolled it out and cut out the pieces in the sizes I'd marked out. I then let the clay sit to dry out a little. I left the olive oil coated straw in the bead to help it keep shape as it dried. When the clay was not longer so soft, I stamped a little butterfly into the back of the main piece using a normal rubber stamp.


Once the pieces were harder and could be moved around without changing shape, using the slip from the syringe, I joined the pieces together to create a box.

This is the back of the box.


And this is why I won't make a box shape again. It was so fragile. When I went to sand it pre-firing, bits broke off. Using the syringe, I repaired it, but was again too rough with it so once again, it came apart. I believe it would be much stronger after the firing, but I didn't want to take the risk. Instead, I reconstituted the clay (added water to it and stuck it in cling wrap overnight) and used it again.

This time I rolled a thicker piece of clay and used a baking paper covered rubber stamp to dent in the space I wanted. I rolled a little snake of clay and joined it at the top.

Once the clay is bone dry, it's ready to fire. There are a number of ways to fire the clay, but with the space considerations we have here in Japan, my husband bought me the "pot" kit. It's really cute. The heat comes from a solid fuel and once it's burnt out, as long as the piece isn't too big, it should be done. It all sits on a fire-resistant board. I love the little rosy-cheeked face the pot has when firing ;)

When it's fired and cool, the piece comes out looking very white. It's not a coating but actually the silver particles sitting straight up.
I had a few little explosions with my piece, I suspect there must have been a little moisture still in there (this is where my lack of patience comes in...). Luckily though, the three bumps were not in a critical place.
With a wire brush, you rub over the piece to bring out it's silver look. I also used some little files to sand off as much of those bumps as I could before I lost feeling in my hands. I also used them to file the top loop to make the shape a bit better. To get the piece to really shine, I then sanded it again, and again and again, each time working with a finer sandpaper, and then in the end with a silver polishing cloth.
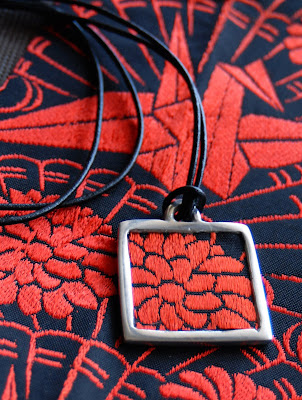
The piece was then ready for the fabric. I backed the obi fabric with iron-on interfacing, cut it to shape and used a really good craft glue to adhere it. I had planned on using resin over the top (hence the original box design) but this piece wasn't deep enough for it.
I have to say, this is going to be a very addictive, but expensive hobby. I went to pick up some more silver clay the other day and boy, it's not cheap!
Before I go... here's a sneak peek at another work in progress....


LinkWithin

Related Posts with Thumbnails