.... and I'm so excited!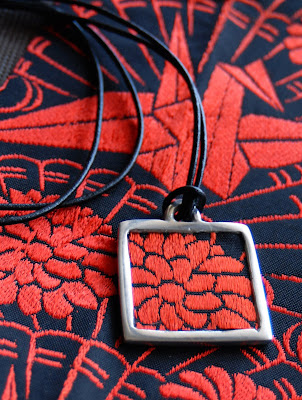
This post could also be called "This is... what I've been doing instead of all the other stuff I should be doing considering I fly out for my holidays in a couple of days"... but we won't worry about that will we? Thanks to Betty the Geek for this week's theme.
This was my second attempt using the silver clay. You can see my first attempt here. While I'm a complete beginner, I still thought you might be interested in how it all works and the mistakes I made along the way.
 I found myself moving to different areas of the apartment for different stages. So this really was workspace number one.
What I have here is a packet of PMC3 and the PMC3 syringe. I've covered my cutting board in baking paper so that the clay doesn't stick. Under the baking paper is a mark out of the pieces I want to make and their sizes. On top of the baking paper, on either side of that markup is a few pieces of cardboard stacked to equal the height of what I want the clay pieces to be. In one bowl is water, the other olive oil. The olive oil is good to stop the clay from sticking to your hands and utensils. There's a straw to help shape the bead at the top and a film container to collect dry bits of clay. I put some of those bits into the lid with a bit of water and use a paintbrush to create slip, to help join pieces together. I have a dry and a wet hand towel. There's also a rolling pin, some kitchen towel and a knife.

The clay comes out like plasticine. It's really easy to use. I rolled it out and cut out the pieces in the sizes I'd marked out. I then let the clay sit to dry out a little. I left the olive oil coated straw in the bead to help it keep shape as it dried. When the clay was not longer so soft, I stamped a little butterfly into the back of the main piece using a normal rubber stamp.
 Once the pieces were harder and could be moved around without changing shape, using the slip from the syringe, I joined the pieces together to create a box.
Once the clay is bone dry, it's ready to fire. There are a number of ways to fire the clay, but with the space considerations we have here in Japan, my husband bought me the "pot" kit. It's really cute. The heat comes from a solid fuel and once it's burnt out, as long as the piece isn't too big, it should be done. It all sits on a fire-resistant board. I love the little rosy-cheeked face the pot has when firing ;)
 When it's fired and cool, the piece comes out looking very white. It's not a coating but actually the silver particles sitting straight up.
I had a few little explosions with my piece, I suspect there must have been a little moisture still in there (this is where my lack of patience comes in...). Luckily though, the three bumps were not in a critical place.
With a wire brush, you rub over the piece to bring out it's silver look. I also used some little files to sand off as much of those bumps as I could before I lost feeling in my hands. I also used them to file the top loop to make the shape a bit better. To get the piece to really shine, I then sanded it again, and again and again, each time working with a finer sandpaper, and then in the end with a silver polishing cloth.
The piece was then ready for the fabric. I backed the obi fabric with iron-on interfacing, cut it to shape and used a really good craft glue to adhere it. I had planned on using resin over the top (hence the original box design) but this piece wasn't deep enough for it.
I have to say, this is going to be a very addictive, but expensive hobby. I went to pick up some more silver clay the other day and boy, it's not cheap!
Before I go... here's a sneak peek at another work in progress....


